
How to Unlock a Record in a Salesforce Approval Process Using Flow
If you’ve ever tried to edit a record after it’s been submitted into a Salesforce Approval Process, you’ve probably seen this message:
This record is locked. If you need to edit it, contact your admin.
This happens because Salesforce automatically locks a record upon initial submission into an approval process while it’s being reviewed. It helps keep the data clean and prevents changes while a decision is being made. But there’s a big catch:
Out of the box, only two types of users can edit locked records:
- System Administrators
- Approvers (if you choose that option in the approval settings)

So what if a Sales Ops user needs to fix a typo? Or what if your Finance team needs to make a quick update? Tough luck—unless they’re an approver or an admin, they’re stuck. Or at least, they were stuck prior to the Summer ‘24 release.
The Before Times
Before Salesforce’s Summer ‘24 release, fixing this problem meant asking a developer to write Apex code. For example, this was a common Apex method used to unlock a record:
public with sharing class ApprovalProcessUtil {
    @InvocableMethod(label='Unlock Record')
    public static void unlockRecords(List<Id> recordIds) {
        Approval.unlock(recordIds, false);
    }
}
But that came with baggage:
- You had to turn on Process Automation Settings to allow Apex to unlock records.
- You needed a developer to write the class or some knowledge of Apex.
- If you wanted it to be admin-friendly and available in flows, you’d need to set it up as an invocable action. And you’d need some knowledge of the Process Instance & Process Definition objects.
This problem was so common that there are fully developed apps on the AppExchange designed just to unlock records. (Yes—entire apps. Just to bypass this Salesforce limitation!)
For most admins, this made things way more complicated than they needed to be.
The Summer ‘24 Solution: Unlock Records in Flow
Thanks to the Summer ‘24 release, Salesforce introduced a new “Lock Record” Flow Action. But here’s the best part:
Despite the name, it can do more than just lock records.
You can also unlock records, and even define which users are allowed to edit locked records. All from Flow—no Apex needed.
🔗 Read the official Salesforce documentation on the Lock Record Flow Action
Example: Unlocking a Record Using Flow
Let’s walk through how to use the new Flow action.
Imagine this use case:
When a Case enters the Approval Process, you want Sales Ops to still be able to update the Priority field.
For the purpose of this example, we’ll assume you already have an approval process set up. Since there’s no way to know when a record has entered into an approval process, we’ll first need to do some backend setup before working on our flow. This includes:
- adding a system field (Is_Locked__c or something similar) on the Case object, and
- adding an
Field Updateaction to the approval process to update the system field after the initial submission.

Adding a system field (or flag field as it is sometimes called) provides a way for us to communicate to the platform when a record has entered into an approval process. It doesn’t need to be on the page layout or visible to any end users, as it is only being used to trigger our flow.
Now, we can begin working on our flow.
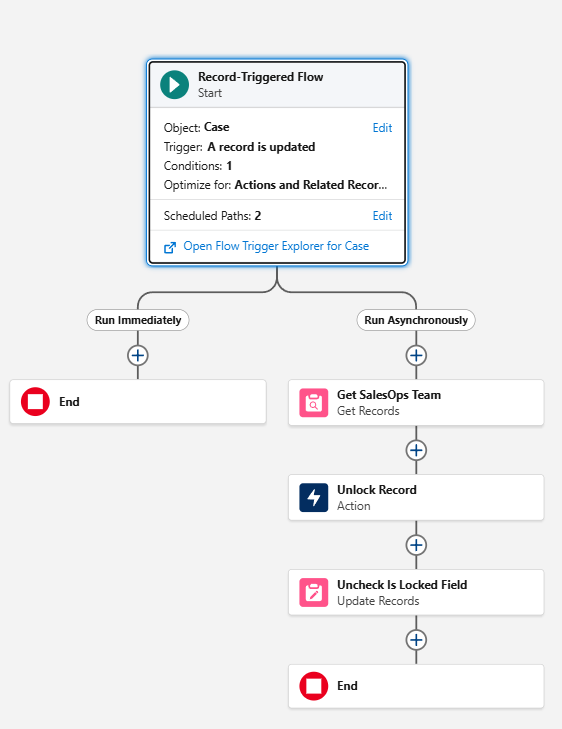
Step 1: Create a Record-Triggered Flow
- Object: Case
- Trigger: When a record is updated
- Entry Conditions: [Is Locked/System Flag Field] Equals true
- Run the flow only when a record is updated to meet the condition requirements.
- Toggle Add Asynchronous Path to true.
The Initial Submission Step happens before the Record is officially locked. So it’s important that the flow runs as a future asynchronous path in order to unlock the record.
Step 2: Add the Flow Elements including the Lock/Unlock Record Action
- (Optional) Get the Group of users you will allow to edit the record. In this example, I’ll set my Sales Ops group as the Allowed ID.
- Search for “Lock/Unlock Record” in the Flow Action element toolbox.
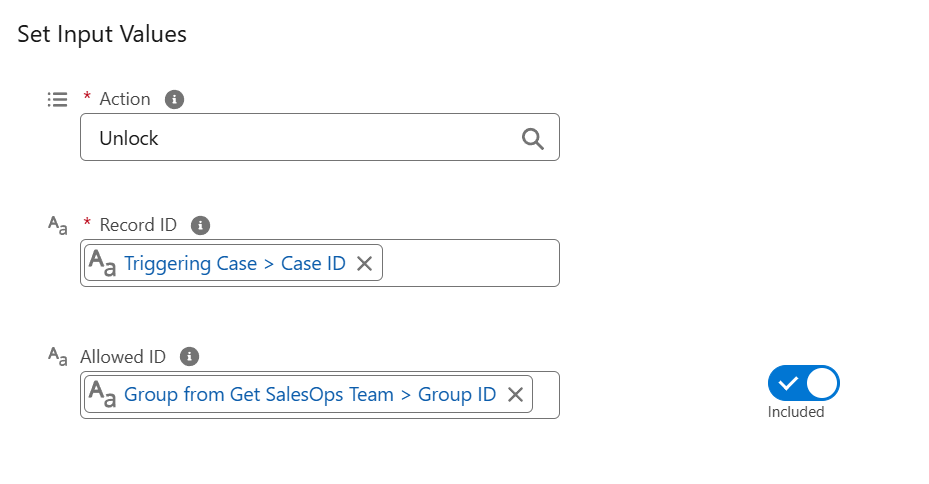
- Set Action Type to “Unlock”. This is just a text value.
- Input the recordId (e.g., the Case record that triggered the flow).
- Under Allowed ID, add a reference to the ID of a user, group, queue, or user role that represents who can edit the record while it’s locked. Note: This step is optional. You could leave it blank and leave the record open to editing by any users with access.
- After you’ve run the Unlock Record action, you’ll also want to uncheck the system/flag field that triggered your flow by updating the triggering record.
Step 3: Save and Activate the Flow
And that’s it! No Apex. No AppExchange. Just one simple Flow.
The Case record is updated right after initial submission. That update triggers your flow to run and unlock the record for editing. The entire automation happens in the background with no additional required actions from any end users.
Why This Changes Everything
Simple use cases like this one no longer require apex. Now, anyone comfortable with Flows can:
- Lock a record to prevent edits.
- Unlock a record for specific users.
- Control the approval process without developer intervention.
This keeps your data protected and your team productive. Use this feature to keep your team moving forward, even while records are under review. Build this in flows so you can collaborate with admins and power users.
With the Summer ‘24 release, Salesforce finally gave admins the tools to control record locks without Apex. The new Lock Record Flow Action makes it easy to unlock a record in the Salesforce Approval Process—and decide exactly who can edit it.
Want to see more Flow automation in action? Check out the following post:
👉 Working with BusinessHours in Salesforce Flows
Happy Flow-building!